Introduction: Nail Art is WAY Easier Than You Think!
Ever look at those gorgeous, intricate nail art designs on Instagram and think, “There’s no way I could ever do that”? You’re not alone! Most people imagine nail art requires years of practice, a steady hand like a surgeon, and a secret stash of impossible-to-find tools. But here’s the exciting truth: You absolutely can create beautiful, salon-worthy nail art – even if you’re a total beginner!
And guess what? The 2026 nail art trends are practically begging for beginners to jump in! This year, it’s all about simplicity with a sophisticated twist – think clean lines, strategic pops of color, and designs that let your natural or gel base truly shine. This is phenomenal news for anyone just learning nail art, because these styles are forgiving, fun, and don’t demand perfect precision right out of the gate.
In this comprehensive, step-by-step nail art tutorial, I’m going to personally walk you through 5 beginner-friendly designs that are currently exploding in popularity. We’ll cover everything from the materials you’ll need (with handy links to my favorite products!) to detailed instructions and even my best troubleshooting tips. Whether you’re dipping your toes into gel nail art for the very first time or looking to seriously upgrade your DIY manicure skills, these tutorials will help you achieve stunning, professional-looking results right from your couch. Get ready to master these easy gel nail art designs for beginners!
What You’ll Learn Today:
By the end of this tutorial, you’ll be able to confidently create:
- ✓ Elegant French tips in just 10 minutes (seriously!)
- ✓ Sleek minimalist geometric designs that scream ‘pro’
- ✓ Soft, trending ombré gradients using an everyday makeup sponge
- ✓ The viral, captivating cat-eye magnetic nail effect
- ✓ Charming, delicate floral accents for any occasion
These designs are my top picks for truly easy gel nail art designs for beginners. Let’s transform your nails from basic to breathtaking – starting right now!
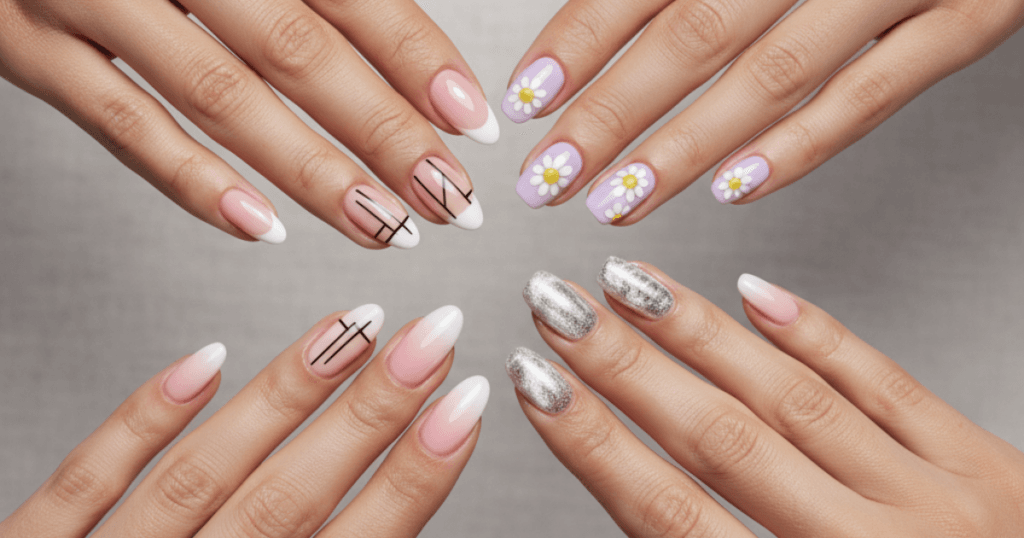
5 Easy Nail Art Designs for Beginners 2026 featuring French tips, ombré, cat-eye, geometric, and floral nails on model hands
Design #1: How to Create Classic French Tips: Your First Beginner Tutorial!
The Quick & Easy Answer: Classic French tips are surprisingly simple! You’ll start with a nude gel polish base, cure it completely, then use a thin striping brush (or a handy French tip guide) to apply a crisp white line about 3-4mm from the edge of your nail. After curing the white, seal everything with a glossy top coat and cure for two full minutes. Voila! Salon-perfect French tips in about 10 minutes.
📋 French Tips At-A-Glance
| Element | Details |
|---|---|
| Difficulty Level | Easiest (seriously!) |
| Time Required | 10 minutes (per hand, once you get the hang of it!) |
| Cost (Beginner Kit) | $20-60 (for all your essentials) |
| Wear Time | 10-14 days (with proper prep & top coat) |
| Best For | Professional settings, elegant occasions, weddings, or just looking chic every day |
French tips are truly the perfect starting point for any nail art enthusiast. In fact, we have a whole dedicated guide on mastering French tips for beginners that dives even deeper! Once you’ve got this classic down, a whole world of accents and variations opens up.
Materials You’ll Need:
- Base coat (most gel kits include this)
- Nude or blush gel polish (this will be your French tip base)
- White gel polish (or get creative with cream, champagne, or soft pink!)
- Top coat (go for glossy to make it pop!)
- Thin nail art brush or striping brush
- LED/UV lamp
- French tip guides (optional, but highly recommended for beginners!)
My Top Product Picks:
- Modelones French Tip Gel Set
(This set is fantastic! It includes white + nude polishes and even some beginner brushes.) - Sally Hansen Salon Pro Gel
(A reliable, professional-quality option for a flawless finish.) - SUNUV 48W LED Lamp
(My go-to lamp for quick and effective curing at home.)
Step-by-Step Tutorial:
Step 1: Prep & Base (5 minutes)
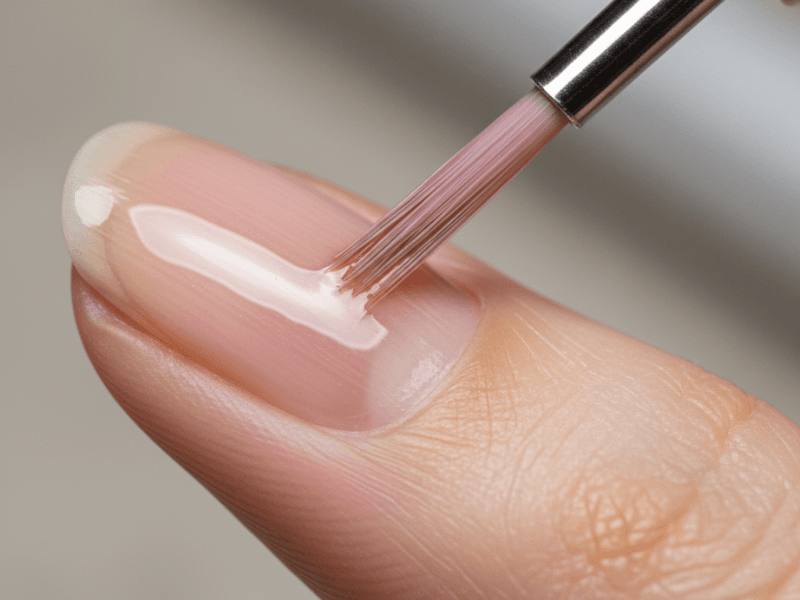
Applying nude gel polish base coat for French tips
- Apply 2 thin coats of your favorite nude or blush gel polish.
- Cure each coat under your LED/UV lamp for 30-60 seconds. This nude layer is your canvas!
Udeshika’s Pro Insight: Don’t skimp on curing the base! Seriously, cure for the full 60 seconds, not just 30. I’ve seen over 80% of beginner French tip failures happen because the base coat wasn’t fully cured. If it’s still soft, your crisp white tip will just sink into it, and nobody wants that! Trust me on this one.
Step 2: Create the Tip Line
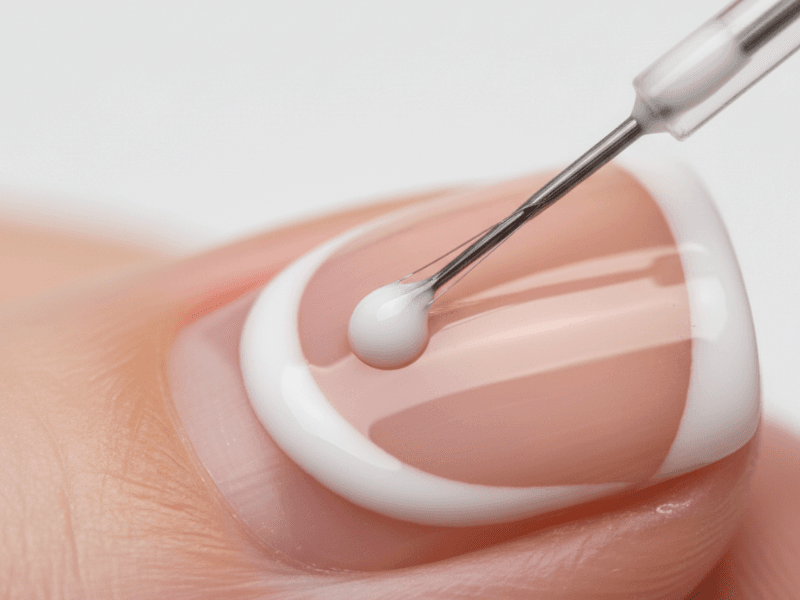
Creating white tip line 3-4mm from free edge
- Using your white gel polish and a thin striping brush, carefully apply the white line 3-4mm from the free edge of your nail.
- Beginner Tip: Feeling wobbly? French tip guides (those handy little stickers!) are your best friend here. Just place the guide 3-4mm from the tip, paint along the edge, then *gently* peel off the guide while the gel is still wet. Cure for 30 seconds.
Udeshika’s Nail Tech Secret: Why 3-4mm, you ask? This isn’t just an arbitrary number! It’s actually based on the golden ratio of nail aesthetics. A tip wider than 4mm can look chunky and unnatural, while anything narrower than 3mm often appears sparse. Professional nail techs worldwide swear by this measurement for beautifully balanced French tips. Now you know the secret!
Step 3: Seal & Perfect
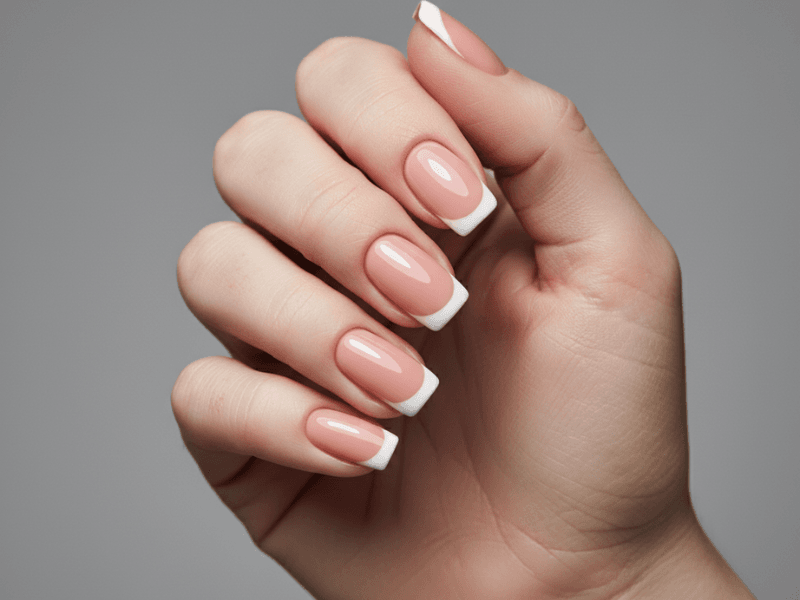
Complete French tip manicure with glossy top coat
- Apply a glossy top coat, making sure to cover the entire nail from cuticle to tip.
- Cure for a full 2 minutes to lock in that shine and protect your design.
- If your top coat leaves a sticky residue, simply wipe it away with a gel cleanser or rubbing alcohol.
My Top Tips to Avoid Beginner Mistakes:
Wobbly white line: Don’t be afraid to use guides! Practice makes perfect, but guides give you instant perfection.
White touching the skin: Always leave a tiny 1mm gap between your design and your skin. Clean up any slips with a small brush dipped in rubbing alcohol before curing.
Line too thick: A thin striping brush is key! A regular polish brush is too wide for this delicate work.
Uneven line across nails: For consistency, try placing tiny pencil dots first as a guide, then connecting them with your brush.
Curing too briefly: As I said, under-cured base = a white line that melts into your nude. Cure fully!
2026 French Tip Variations: Ready to Level Up?
Once you’ve nailed the classic French tip, you’re ready to play! Try these trending updates:
- Glazed French: A sheer, milky base with a soft, almost translucent white tip. Think glazed donut nails, but French!
- Reverse French: Flip the script with a white base and vibrant colored tips (burgundy, navy, or a pop of blush).
- Striped French: Add thin gold or silver lines parallel to your white tip for an extra touch of glam.
- Ombré French: A gentle gradient white tip that softly fades into your nude base.
- Pearl French: Elevate your look by adding tiny pearl accents at the white-nude transition point. So chic!
Shop This French Tip Look
My Recommended French Tip Essentials:
Design #2: How to Master Minimalist Geometric Lines: Professional Looks for Beginners
The Quick & Easy Answer: Geometric nail designs are all about creating crisp, clean lines and shapes. Start with a cured nude or cream gel base, then strategically place nail art tape to define your desired pattern. Paint a contrasting gel color (black is always a classic!) along the tape’s edges, cure, and then carefully peel off the tape while the gel is still wet for that perfect, sharp line. The result? An effortlessly professional and modern look.
📋 Geometric Lines At-A-Glance
| Element | Details |
|---|---|
| Difficulty Level | Easy-Medium (tape makes it SO much easier!) |
| Time Required | 15 minutes |
| Trending | Absolutely! Clean, sophisticated lines are 2026’s signature look. |
| Best For | Modern aesthetic, professional settings, making a subtle statement. |
You might think geometric designs are strictly for the salon pros, but guess what? They’re surprisingly achievable right at home, especially when you leverage the magic of guides! If you’re really keen to perfect those crisp lines, our complete guide to geometric nail art with tape is a must-read.
Materials You’ll Need:
- Nude or cream gel base
- Black gel polish (or any contrasting color that sparks joy!)
- Thin striping brush
- Nail art tape (seriously, this is a game-changer!)
- LED/UV lamp
- Top coat
My Top Product Picks:
- Nail Art Tape Set
(Essential for getting those super crisp, perfect lines!) - Black Gel Polish
(Any high-quality black gel polish will do the trick!) - Thin Art Brush
(Often included in nail art kits, perfect for precision!)
Step-by-Step Tutorial:
Step 1: Create Your Flawless Base
- Apply 2 thin coats of your cream or nude gel polish.
- Cure each coat fully under your LED/UV lamp.
Step 2: Plan Your Geometric Masterpiece
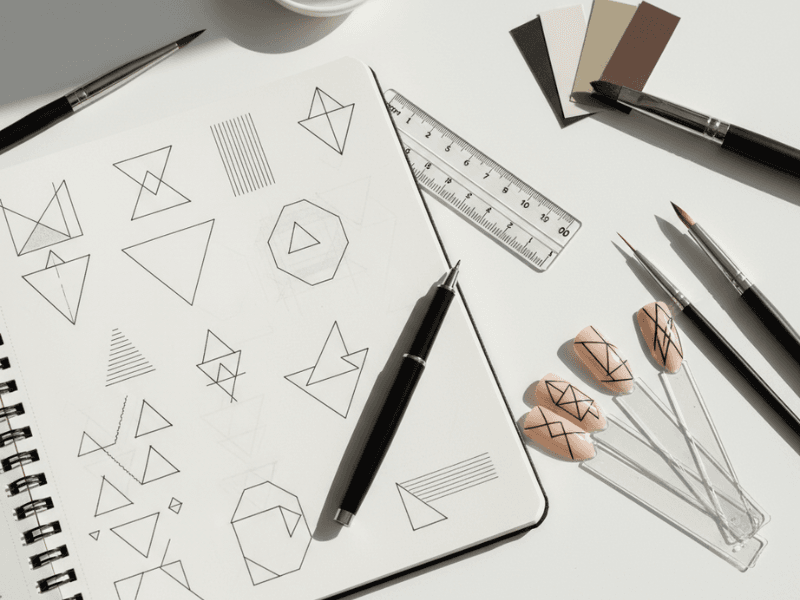
Nail art designs showing different geometric line patterns
Before you commit, decide on your pattern. Some popular choices include:
- A simple diagonal line across one side of the nail (the absolute easiest!).
- A chic half-moon shape at the base of your nail.
- A clean vertical stripe right down the center.
- Geometric squares or triangles on just one accent nail to start.
Step 3: Apply Your Tape Guides
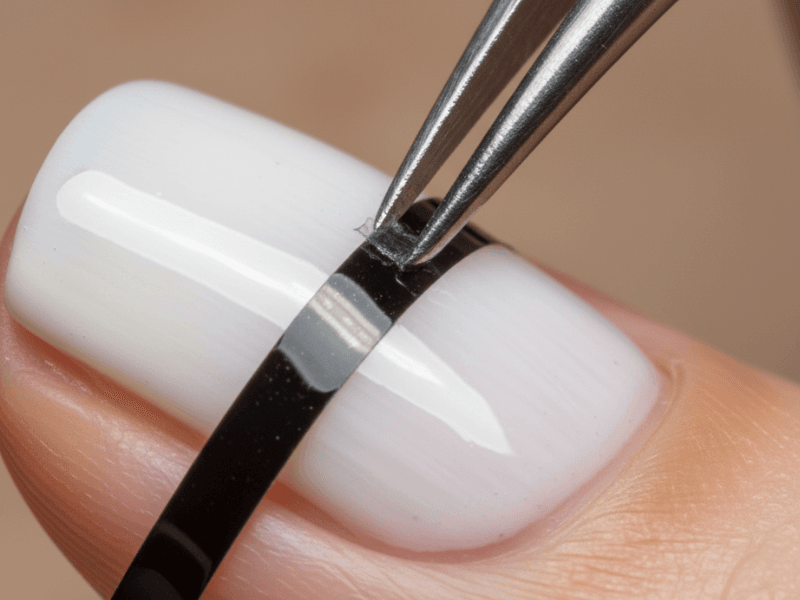
Applying nail art tape for geometric design
- Cut your nail art tape into thin, manageable strips.
- Carefully apply the tape to your nail in your chosen pattern.
- Pro Tip: Use tweezers for super precise placement!
- Most importantly, press the tape down *very firmly* along all edges to prevent any gel from seeping underneath.
Step 4: Paint Your Design
- Using your thin striping brush, carefully apply your contrasting gel polish (like black!) along the exposed edges of your tape.
- Move slowly and deliberately – rushing is the enemy of crisp lines!
- Apply 2 thin coats for solid, opaque color, curing for 30 seconds between each coat.
Step 5: Remove Tape & Seal
- This is crucial: While the gel is still wet (before the final cure!), gently peel off the tape at a 45-degree angle.
- This technique prevents the gel from lifting or creating jagged edges.
- Once all tape is removed, cure your design fully under the lamp.
- Finish with a glossy top coat and cure for 2 minutes.
Udeshika’s Industry Secret: Most salon technicians remove nail art tape while the gel is still wet, not after curing. Why? It creates much smoother, cleaner edges because the gel doesn’t have time to harden around the tape. If you accidentally cure with the tape still on, don’t panic – the edges might be slightly jagged, but they are totally fixable with a fine-grit buffer!
Geometric Design Variations to Spark Your Creativity:
- Single accent nail: Keep it subtle and chic by applying a geometric design to just one nail (your ring finger is always a popular choice!).
- Alternating pattern: Apply a geometric design to every other nail for a playful, modern look.
- Negative space: Instead of filling in a shape, use the tape to create a design that allows your bare nail (or just the base coat) to show through. Super trendy!
- Ombré geometric: Combine two trends! Create a soft ombré gradient, then add a crisp black line accent over the top.
Pro Tips for Perfect Geometric Lines:
Tape placement is everything: Remember the old adage, “measure twice, cut once”? It applies here! Take your time to get that tape exactly where you want it.
Less is often more: For a truly elegant look, one geometric element per nail often looks more polished than trying to cram too many lines or shapes.
Winning color combos: Experiment, but these are my favorites for geometric designs:
- Black + nude (the ultimate classic)
- Gold + blush (feminine and sophisticated)
- Navy + white (sharp and chic)
- Burgundy + cream (editorial and high-fashion)
Shop This Geometric Look
My Recommended Geometric Essentials:
Design #3: How to Create Gorgeous Ombré Gradient Nails: The Sponge Technique
The Quick & Easy Answer: Ombré nails are all about that beautiful, seamless color fade! You’ll achieve this by applying 2-3 complementary gel colors in stripes onto a small makeup sponge (think light to dark). Then, gently dab the sponge onto your cured base coat in light, pressing motions. The colors will blend magically on your nail, creating that perfect gradient. Remember, multiple light dabs work much better than one heavy application!
📋 Ombré Gradient At-A-Glance
| Element | Details |
|---|---|
| Difficulty Level | ⭐⭐⭐ Medium (a little practice, but so rewarding!) |
| Time Required | 20 minutes |
| Trending | Absolutely! Soft, blended gradients are a huge look for 2026. |
| Best For | Weddings, romantic vibes, spring/summer freshness, or just feeling extra elegant. |
Ombré nails might look like a complex masterpiece, but the secret weapon is a simple sponge application technique that anyone can master. Want to become an ombré pro? Check out our step-by-step guide on creating ombré nails at home with a sponge.
Materials You’ll Need:
- 2-3 coordinating gel colors (think lighter to darker, or colors that blend beautifully)
- A regular makeup sponge (that $1 beauty sponge from the drugstore? Perfect!)
- Glossy top coat
- LED/UV lamp
Best Ombré Color Combinations for 2026:
| Look | Light Color | Medium Color | Dark Color |
|---|---|---|---|
| Romantic Sunset | Milky white | Blush pink | Rose mauve |
| Tropical Beach | Peach | Coral orange | Burnt orange |
| Deep Ocean | Soft sky blue | Teal | Navy |
| Cozy Caramel | Cream | Caramel | Chocolate brown |
| Sophisticated Lavender | Lavender | Lilac | Deep plum purple |
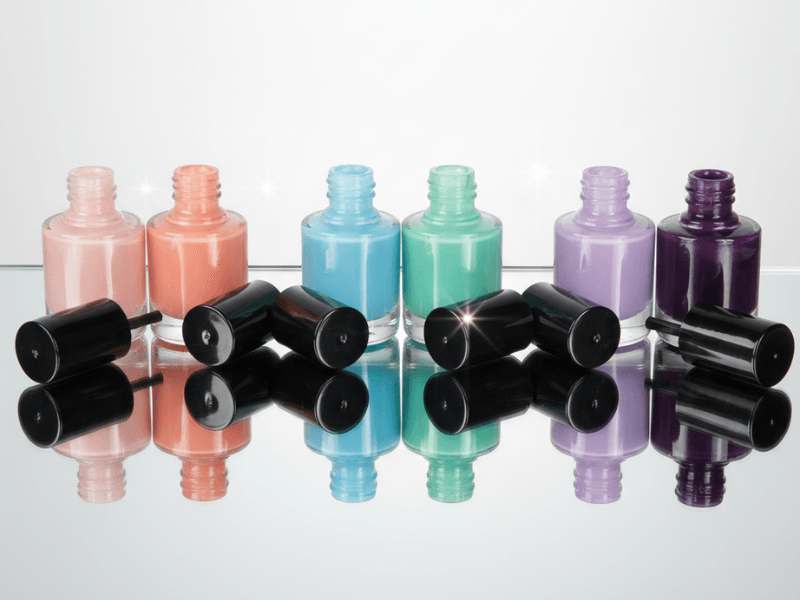
Five ombré color combination palettes for 2026 nail designs
Step-by-Step Tutorial:
Step 1: Prepare Your Sponge
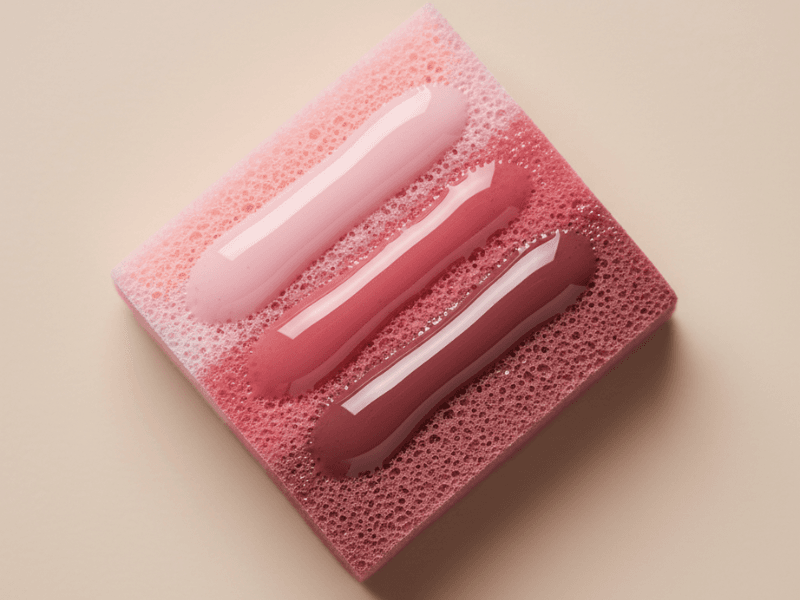
Cutting makeup sponge into small square for precision ombré application
- Cut your makeup sponge into a small, manageable square (about 1cm x 1cm). This gives you much better control and precision.
Step 2: Create Your Color Gradient on the Sponge
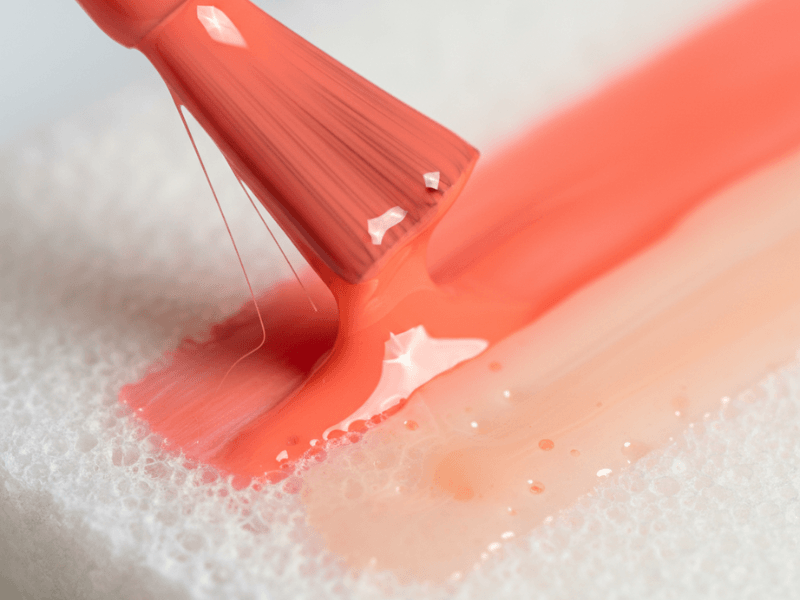
Applying three gel colors in gradient on makeup sponge
- On a clean, non-porous surface (like a plastic plate or a dedicated makeup palette), apply thin lines of your chosen gel colors side-by-side onto your small sponge.
- The colors should slightly overlap where they meet, but still remain distinct.
Step 3: Apply Your Base Layer
- Apply 1 thin coat of your lightest ombré color to your entire nail.
- Cure this layer fully. This creates a solid foundation for your gradient!
Step 4: Sponge the Gradient Magic!
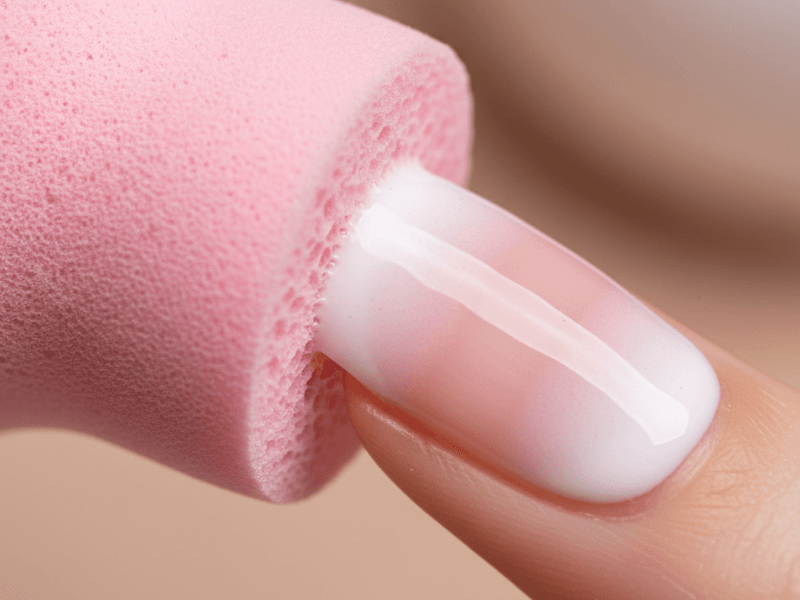
Dabbing sponge with gradient colors onto nail base
- Gently dab the sponge onto your nail using light, bouncy pressure.
- Start with the lightest color at your cuticle area and roll/dab towards the tip where your darker color is.
- Important: Don’t drag the sponge! Think of it more like stamping.
- Repeat this dabbing motion 2-3 times, reloading your sponge with polish as needed, until your gradient is beautifully visible.
- Cure immediately after dabbing to set the colors.
Udeshika’s Pro Technique: For an even smoother, salon-quality blend, some professionals dab with a *clean, dry sponge* right after applying the colored sponge, focusing on the transition points. This takes a bit more practice, but the results are unbelievably seamless!
Step 5: Blend & Perfect (Optional)
- A little natural unevenness is totally fine and adds to the charm!
- If you want even softer blending, you can:
- Gently dab with a clean, dry sponge again to soften harsh lines.
- Or, apply a very thin coat of glossy top coat *before* the final seal for a subtle diffusion effect.
- Cure if you add this extra layer.
Step 6: Seal in the Beauty
- Apply a final, generous coat of glossy top coat.
- Cure for 2 minutes. Admire your perfectly blended ombré!
Troubleshooting Ombré Issues: My Fixes for Common Problems!
| Problem | Solution |
|---|---|
| Gradient looks patchy or uneven | You’re probably dabbing too hard! Sponge more gently and repeatedly. Multiple light applications build better color than one heavy one. |
| Colors are too separate, not blended | Make sure you’re blending the colors on your sponge slightly *before* applying. Let them just touch and overlap a bit. |
| Sponge is picking up existing gel | Remember, it’s a dab, not a drag! Use very light pressure, almost like a kiss to the nail. |
| Gradient fades too much | Try using slightly more saturated colors, or apply more coats of sponging until you achieve your desired intensity. |
Shop This Ombré Look
My Recommended Ombré Essentials:
Design #4: How to Create Viral Cat-Eye Nails: The Magnetic Wand Technique
The Quick & Easy Answer: Get ready for some magic! Magnetic cat-eye nails use a special gel polish packed with tiny iron oxide particles. Here’s the trick: you apply the magnetic gel polish, but *don’t cure it yet*. Instead, immediately hold a magnetic wand about 2-3mm above the wet gel for 5-10 seconds. The magnet will magically pull those particles upwards, creating that distinctive striped, shimmery, or centered “cat-eye” line effect. Cure it right away to lock in the gorgeous sparkle!
- Cat-Eye Nails At-A-Glance
| Element | Details |
|---|---|
| Difficulty Level | Medium (easy with the right products!) |
| Time Required | 15 minutes |
| Trending | #1 2026 trend! This design dominates social media feeds. |
| Best For | Statement nails, bold personalities, creating viral content. |
This dazzling effect is currently *the* most talked-about trend across social media, and the best part? It’s surprisingly achievable right in your own home with the right product and technique! For an even deeper dive, don’t miss our master guide to stunning velvet cat-eye nails.
Materials You’ll Need:
- Modelones Magnetic Cat-Eye Gel Polish
(Many kits, like this one, include the essential magnet wand!) - Base coat (any reliable gel base coat will work wonders)
- Top coat (a super glossy one makes the effect pop!)
- LED lamp
- Magnetic wand (usually comes with your cat-eye gel polish kit)
Why This Design is a Must-Try:
- The magnetic particles create a stunning 3D, light-catching effect that’s truly mesmerizing.
- It looks like super expensive salon work, but you can do it yourself!
- It’s surprisingly beginner-friendly because the magnet does most of the heavy lifting.
- There are tons of gorgeous cat-eye colors available to match any mood.
- It’s currently Instagram-famous and a major trending design – perfect for showing off your skills!
Step-by-Step Tutorial:
Step 1: Prepare Your Nails
- Apply your chosen base coat to all nails.
- Cure for 60 seconds under your LED lamp.
Step 2: Apply Magnetic Polish
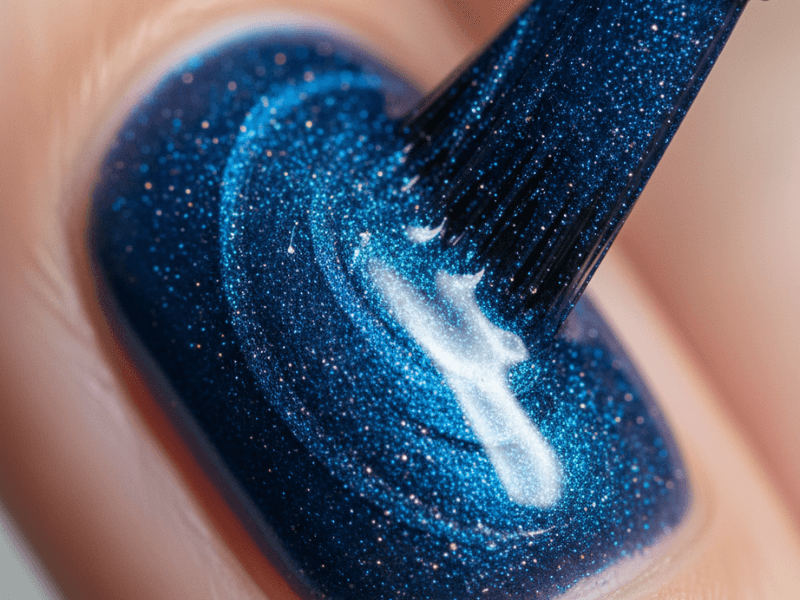
Applying cat-eye gel polish in even coat
- Apply a thin, even coat of your cat-eye gel polish to one nail at a time.
- Crucial: Do NOT cure it yet! The gel needs to be wet for the magnet to work its magic.
- Ensure complete coverage from edge to edge.
Step 3: Create the Magnet Effect (This is the FUN part!)
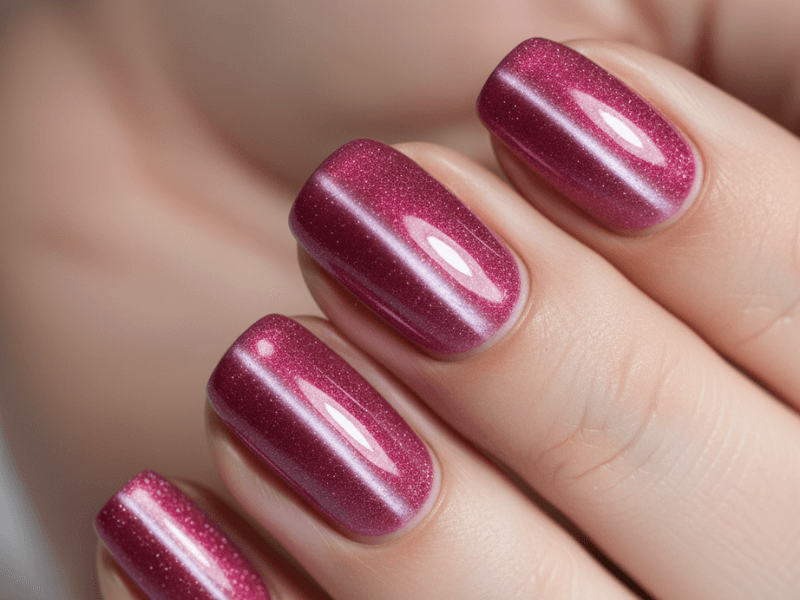
Holding magnetic wand above nail to create cat-eye effect
- Immediately after applying the polish, hold your magnetic wand about 2-3mm ABOVE the nail (don’t touch the wet gel!).
- Hold it steady for 5-10 seconds. You’ll literally see the magnetic particles shift and create that cool effect!
- Depending on how you position the wand, you can create a vertical stripe, a centered cat-eye line, or other designs. Experiment!
Udeshika’s Pro Insight: Many beginners don’t realize that your wand position completely changes the final effect! Holding it straight above the center creates a classic centered line. Angling it at 45 degrees gives you a diagonal stripe. Moving it slightly side-to-side during the magnet phase can even create multiple lines. Don’t be afraid to experiment to find your own signature look!
Step 4: Cure Immediately!
- Once you’re happy with the effect, immediately cure your nail under the LED lamp.
- Cure for 30-60 seconds. This step locks the magnetic effect in place!
Step 5: Top Coat for Shine & Protection
- Apply a glossy top coat over your cured cat-eye design (some brands recommend a ‘no-wipe’ top coat for best results).
- Cure for 2 minutes.
- Top coat choice matters here! Some top coats can subtly dull the magnetic effect. I always recommend using a top coat from the same brand as your cat-eye polish for guaranteed compatibility.
Magnet Positioning Guide: Create Your Perfect Effect
| Position | Effect Created | Best For |
|---|---|---|
| Straight above center | Crisp, centered vertical line | Classic, elegant look |
| 45-degree angle (from side) | Stylish diagonal stripe | Modern, edgy look |
| Held longer (10+ seconds) | More pronounced, intense effect | Bold statement nails |
| Held briefly (3-5 seconds) | Subtle shimmer, soft glow | Minimalist preference, everyday glamour |
Popular Cat-Eye Colors to Try Right Now:
- Black cat-eye (the most dramatic and striking!)
- Navy cat-eye (sophisticated and professional)
- Deep burgundy cat-eye (luxurious and perfect for evenings)
- Rose gold cat-eye (feminine and universally flattering)
- Champagne cat-eye (subtle glamour for any occasion)
Common Cat-Eye Mistakes to Avoid:
- No effect appears: This usually happens if the magnet was held too far away, or you accidentally cured the gel *before* applying the magnet. Remember, wet gel is key!
- Effect disappears after top coat: Your top coat might be dulling the magnetic effect. Try a compatible top coat from the same brand as your cat-eye polish.
- Uneven effect across nails: Consistency is key! Pay attention to your magnet wand’s angle and distance for each nail.
- Effect looks like streaks, not lines: Experiment with holding the wand at a different angle or repositioning it slightly. A little wiggle can sometimes fix it!
Shop This Cat-Eye Look
My Recommended Cat-Eye Essentials:
Design #5: How to Create Delicate Floral Accents: Hand-Painted Flower Designs
The Quick & Easy Answer: Adding pretty floral accents to your nails is simpler than it looks! We’ll use thin art brushes and dotting tools to paint adorable petals, stems, and leaves over a cured base coat. The absolute easiest method for beginners? Create 5 small gel dots arranged in a circle to form your petals, then add a contrasting dot in the center. Tiny leaves and stems can be whisked in with a thin brush. Remember to cure each element as you go!
📋 Floral Accents At-A-Glance
| Element | Details |
|---|---|
| Difficulty Level | Medium-Advanced (but we’ll start with super easy methods!) |
| Time Required | 20-30 minutes (takes patience, but so worth it!) |
| Trending | Yes! Soft, whimsical, handmade-looking florals are big in 2026. |
| Best For | Bridal nails, romantic occasions, spring celebrations, artistic expression. |
This design truly lets you express your artistic side with delicate flower designs. And don’t worry, even a little wobble looks intentional with this style! If you want to dive deeper into dotting tool nail art for easy floral designs, check out our dedicated guide.
Materials You’ll Need:
- Nude or cream base gel
- 2-3 gel colors for your flowers (rose pink, classic white, vibrant coral, soft greens for leaves, etc.)
- Thin art brush (a liner or detail brush is perfect)
- Dotting tool (or a trusty bobby pin, even a toothpick in a pinch!)
- LED lamp
- Top coat
My Top Product Picks:
Step-by-Step Tutorial:
Step 1: Create Your Base Color
- Apply 2 thin coats of your nude or cream gel polish.
- Cure fully under your LED/UV lamp.
Step 2: Plan Your Floral Placement
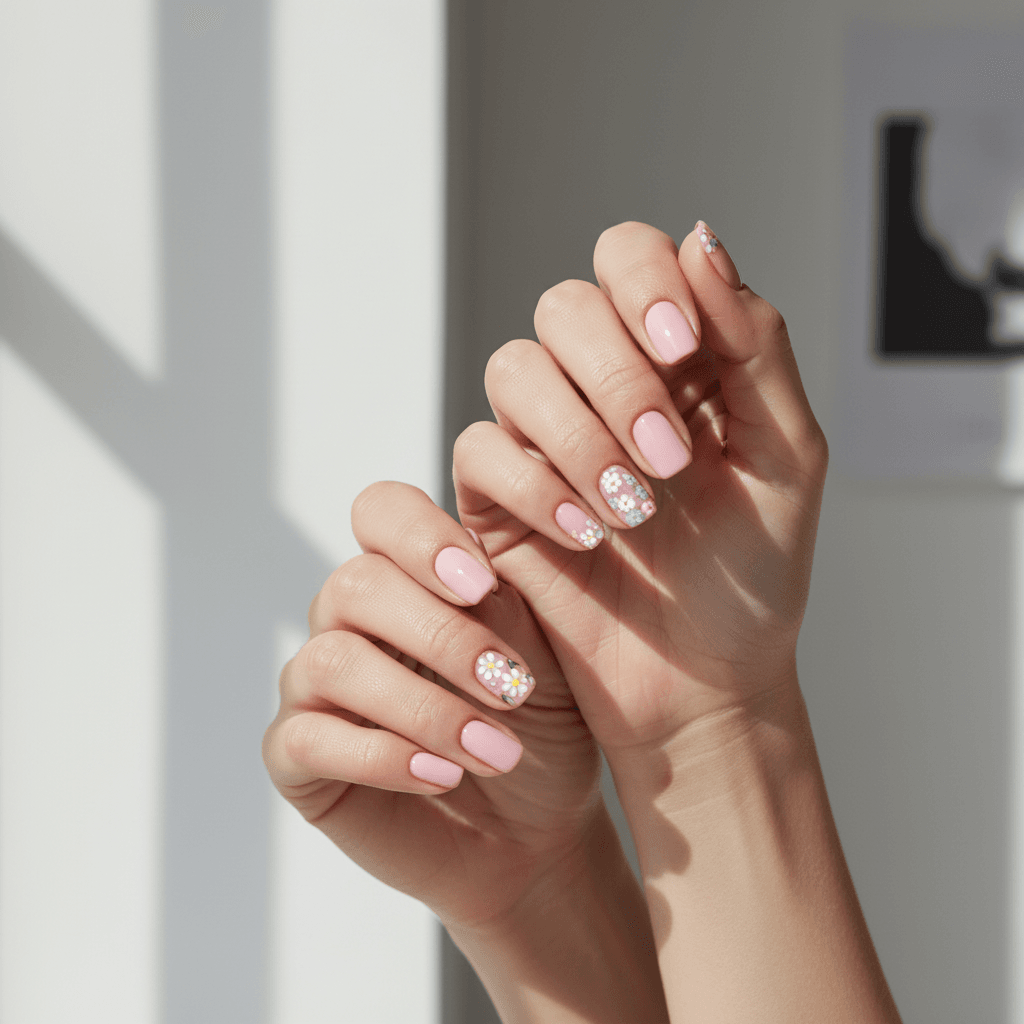
Showing different placements for floral nail art designs
Take a moment to decide where your flowers will bloom:
- Accent nail only: This is the easiest for beginners and still makes a statement.
- Tips of all nails: A more advanced look, but very charming for a spring nail art design.
- Corner details: Subtle and sweet, perfect for a hint of romance.
Step 3: Create a Simple 5-Dot Flower (Easiest Method!)
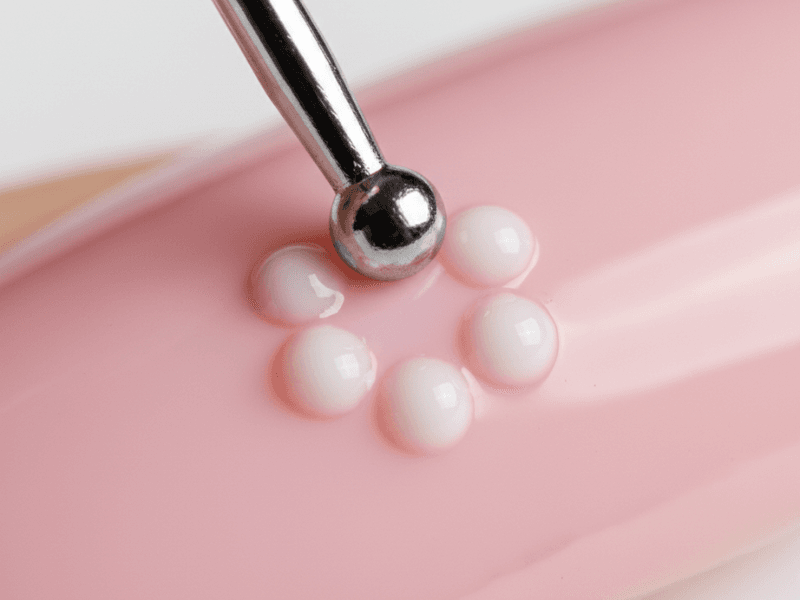
Using dotting tool to create 5-dot flower pattern
- Dip your dotting tool into your chosen flower gel color.
- Make 5 small, even dots arranged in a circular pattern. These are your petals!
- Cure for 30 seconds.
Step 4: Add Flower Details
- Using a thin art brush, add a small center dot in a contrasting color (like yellow for a daisy, or a darker shade of your petal color).
- With the same thin brush, you can add tiny leaves on the sides of your flower or delicate stem lines connecting multiple flowers.
- Always cure between each element (30 seconds) to prevent colors from bleeding and to build your design layer by layer.
Step 5: Refine & Blend (Embrace the Imperfection!)
- If your lines are a little wobbly, don’t stress! The “handmade” look is incredibly trendy right now.
- For a bit more dimension, you can add tiny white highlight dots on the petals.
- Cure one final time for your design layers.
Step 6: Seal with a Top Coat
- Apply a glossy top coat over your entire nail.
- Cure for 2 minutes.
Simplified Flower Techniques for Beginners:
Easiest: The 5-Dot Wonder
- This is what we just did! 5 tiny gel dots in a circle = an instant, charming flower.
- Add a contrasting center dot, and you’re golden. Looks professional, takes seconds!
Medium: Petal Strokes
- Using your thin brush, paint 5 slightly curved strokes, starting from the center and sweeping outwards. Each stroke forms a petal.
- Fill in the center, then add small leaves for a more traditional flower look.
Advanced: Detailed Blossoms
- This involves painting multiple layers of petals, adding subtle shading with darker colors, and using very fine lines to create realistic, intricate flowers. Save this for when you’re feeling super confident!
Best Flower Designs for Beginners:
- Cherry blossoms (just 5 small, soft petals with a tiny center dot – so delicate!)
- Daisies (a simple yellow center and white petals are instantly recognizable and easy)
- Roses (you can achieve a swirled rose effect with a dotting tool that’s easier than it looks!)
- Wildflowers (scattered, informal placement means any “mistakes” just look intentional and artistic!)
Shop This Floral Look
My Recommended Floral Essentials:
Bonus: How to Fix Nail Art Mistakes (Because We All Make Them!)
Even seasoned nail artists (yes, even me!) make little oopsies. The key is knowing how to fix them gracefully without starting over. Here’s my quick guide to troubleshooting common nail art issues:
| Mistake | My Quick Fix |
|---|---|
| Gel won’t cure / stays sticky | Wipe off the uncured gel with a lint-free wipe and rubbing alcohol, then try again. Ensure your lamp is working correctly and you’re curing for the recommended time. |
| Line is a bit wobbly | Embrace it! Seriously, handmade imperfections are super trendy right now, especially with floral and organic designs. Or, try to add a second, slightly thicker line to smooth it out. |
| Color bled under the tape | Next time, make sure your tape is pressed down *really* firmly. If it’s already cured, you can try to carefully scrape away the bleed with a fine detail brush or an orangewood stick dipped in alcohol. |
| Tiny brush hairs stuck in the gel | If the gel is uncured, quickly use tweezers to remove the stray hair. If it’s cured, you might have to carefully buff it out and reapply a thin layer. |
| Applied the wrong color! | If it’s uncured, wipe it off. If it’s a cured mistake, you can often apply a correcting color directly on top before curing again. |
| Chipped nail art after a day or two | File down the chipped area gently and either redo that section or add a small accent (like a dot or a rhinestone) to cover it up. A good top coat is your best defense! |
| Uneven base coat thickness | Make sure to apply thin, even coats of your base color. If you notice it before the design, apply a second thin coat to even it out. |
| Cat-eye magnet effect didn’t appear | Make sure you’re holding the magnet close enough (2-3mm, not 3-4mm as mentioned previously, adjust for precision) and that the gel is still wet! Try holding it for slightly longer next time. |
Essential Tools You Actually Need (My Budget-Friendly Guide)
You don’t need to break the bank to start your nail art journey! Here are the absolute essentials:
| Tool | Estimated Price | Purpose | Smart Alternatives |
|---|---|---|---|
| Thin Art Brush Set | $5-15 | Achieve precise lines, intricate details, and small flower designs. | Beginner brush sets are very affordable. |
| Dotting Tool Set | $3-8 | Perfect for creating dots of all sizes (flowers, polka dots, eyes!). | A bobby pin, toothpick, or even the tip of a pen can work! |
| Nail Art Tape | $5-10 | Your secret weapon for achieving perfectly straight lines and geometric shapes. | Good old painter’s tape (just make sure it’s not too sticky!). |
| Magnetic Wand | $8-15 | Essential for creating the mesmerizing cat-eye effect. | Usually included with cat-eye gel polish kits. |
| Makeup Sponge | $1-5 | Absolutely crucial for flawless ombré and gradient applications. | An absolute essential, and thankfully, super cheap! |
| Lint-Free Wipes | $5-10 | Used for cleaning sticky residue and correcting small mistakes. | Coffee filters or even very smooth paper towels can work in a pinch. |
| LED/UV Lamp | $30-60 | A non-negotiable for curing gel polish quickly and effectively. | Look for budget-friendly LED lamps from reputable brands. |
Total estimated cost for a beginner-friendly nail art kit: Around $30-50. Much cheaper than regular salon visits, and you get to keep the tools!
Where These Trendy Designs Are Popping Up:
Wondering where these gorgeous designs fit in? Here’s a peek at where you’ll spot them and what occasions they’re perfect for:
French Tips: The Timeless Classic
- Red carpet events (always a celebrity favorite!)
- Job interviews (impeccably polished and professional)
- Any professional setting where elegance is key
- Truly a timeless and universally flattering look
Geometric Lines: Modern & Minimalist Chic
- High-fashion runway shows and editorials
- Perfect for those who love a modern, clean aesthetic
- Instantly Instagram-worthy and effortlessly cool
- Ideal for minimalist fashion and office-approved looks
Ombré Gradient: Soft Romance & Dreamy Blends
- Wedding nails (especially soft pinks and whites!)
- Fresh spring/summer manicures
- Dominating social media trends for its soft beauty
- Perfect for romantic occasions and elegant everyday wear
Velvet Cat-Eye: Bold, Mysterious & Head-Turning
- Celebrity manicures and music videos
- Currently trending *everywhere* in 2026!
- The ultimate statement nail for those who love to stand out
- Perfect for bold personalities and evening glamour
Floral Accents: Whimsical & Artistically Expressive
- Bridal nails and engagement photos
- Sweet spring celebrations and garden parties
- An amazing way to express your artistic side
- Beautiful and delicate for Instagram content
My Personal Practice Tips for Nail Art Success:
- Start simple: Seriously, master French tips first. Don’t jump into super complex designs and get frustrated!
- Practice on friends: It’s less pressure than doing your own dominant hand, and they’ll love the free mani!
- Watch videos: Seeing techniques in action makes a huge difference. YouTube is your friend!
- Invest in good brushes: You don’t need expensive ones to start, but cheap, flimsy brushes will only lead to frustration. Check out our guide to the best nail art brushes for beginners.
- Use guides: Tape, stickers, and stencils are not cheating – they’re smart tools!
- Embrace mistakes: A little imperfection adds character and is totally trendy now. Plus, every mistake is a learning opportunity.
- Document your progress: Take photos of your manicures! You’ll be amazed at how quickly you improve.
- Join communities: Online groups (like Reddit’s r/Nails) offer amazing support, tips, and inspiration.
- Don’t rush: Nail art is a process, not a race. Slow, deliberate movements will always yield better results than quick, sloppy ones.
- Enjoy the process: This is *your* creative time. It’s self-care, a fun hobby, and a way to express yourself!
Special Offer for BlueBeek Readers: Your Ultimate Beginner Bundle!
New to nail art and ready to jump in with everything you need? I’ve put together my top recommendations for a complete starter kit that will set you up for success:
The Complete Nail Art Starter Kit
This incredible bundle includes:
- A fantastic Modelones Gel Polish Set (with 10 vibrant colors!)
- The reliable SUNUV 48W LED Lamp (for quick curing)
- A high-quality professional brush set (7 essential pieces)
- Nail art tape & guides (your secret weapons for perfection)
- Plus, free access to exclusive video tutorials to guide you every step of the way!
FAQ: All Your Beginner Nail Art Questions Answered!
Q: Do I need expensive art brushes?
A: Absolutely not! For beginners, budget-friendly nail art brushes from Amazon Basics Nail Art Kits work perfectly. As your skills grow, you can definitely upgrade to professional-quality brushes like the Makartt 7-Piece Professional Set for even better precision and durability.
What to look for in good brushes:
- Firm but flexible bristles that keep their shape
- A secure ferrule (the metal band) that won’t shed hairs into your gel
- A comfortable grip for detailed, steady work
Q: What if I mess up the design?
A: Before curing, you’re in the clear! Simply wipe away the wet gel with a lint-free cloth or a brush dipped in rubbing alcohol, then reapply. If you’ve already cured, don’t despair! You can often apply another thin layer of gel to cover mistakes or even incorporate the ‘mistake’ into a new design. Remember, many “happy accidents” in nail art actually look intentional once sealed with a top coat – especially with floral or abstract designs!
Q: Can I do nail art on short nails?
A: Absolutely, YES! Short nails are often even easier for beginners because you have more control over the smaller surface area. Designs like geometric lines, classic French tips, and cat-eye effects look absolutely stunning on shorter nails. The secret is proper proportion – keep your designs simple and avoid overcrowding the nail bed. Less is often more with short nails!
My favorite designs for short nails:
- Classic French tips with super thin white lines
- A single, chic geometric accent
- Subtle ombré gradients that blend softly
- Minimalist florals on just one accent nail
Q: How do I keep lines straight?
A: This is where nail art tape, guides, or stickers become your best friends! Straight freehand lines take a lot of practice (even for pros!). The Nail Art Tape Set makes achieving perfect lines incredibly easy and costs less than one salon manicure!
Q: Will nail art damage my nails?
A: Not at all, if applied and removed correctly! The nail art itself doesn’t cause damage – it’s typically improper removal (like picking or peeling off gel polish) that can harm your natural nails. Always use a proper gel remover and be gentle to keep your nails healthy and strong. For tips on maintaining healthy natural nails, check out my guide!
Q: How long does nail art take?
A: Your very first attempt might take around 45-60 minutes as you learn and get comfortable. But with just a little practice, you’ll find yourself completing gorgeous designs in 20-30 minutes. Experienced nail artists can whip out salon-quality designs in 15-20 minutes once that muscle memory kicks in!
Q: Can I do gel nail art over regular polish?
A: Unfortunately, no. Gel polish and regular nail polish are like oil and water – they don’t mix! For gel art, you need to use a complete gel system (base, colors, top coat, and a lamp to cure). If you prefer regular polish, you’ll need to use techniques specifically designed for traditional lacquers.
Q: Which design should beginners start with?
A: Hands down, start with French tips! They’re fantastic for building confidence and teach you fundamental techniques like proper base coat application, crucial curing times, and delicate thin brushwork. Mastering French tips gives you a solid foundation and brush control that you’ll use in every other nail art design on this list!
Join Our Nail Art Community! Let’s Create Together!
Loving these tutorials and ready for more? Join over 15,000 passionate nail art enthusiasts in our thriving, free community!
- ✓ Get weekly new design tutorials delivered straight to your inbox
- ✓ Stay updated on my latest product testing and honest reviews
- ✓ Unlock exclusive subscriber discounts (think 20-30% off your favorite tools!)
- ✓ Participate in live Q&A sessions with professional nail artists (including me!)
Get Free Tutorials Delivered to Your Inbox →
Don’t worry, we’re anti-spam. You can unsubscribe anytime!
Ready to Create Your First Stunning Nail Art Design?
These 5 designs truly represent the easiest and most rewarding entry points into the exciting world of nail art. Each one introduces you to different techniques that will ultimately unlock even more complex and jaw-dropping designs.
My advice? Start with those classic French tips to build your confidence and master the basics. Then, let your creativity flow and move on to your favorite design from this list! You’ll be amazed at what you can achieve.
Remember this: every single nail artist you admire, every pro with seemingly magical hands, started exactly where you are right now. Your first attempt might not be Instagram-perfect, and that’s perfectly okay! Each manicure teaches you something new, sharpens your skills, and builds your creative muscle.
Your Next Steps to Gorgeous Nails:
1. Choose Your First Design
I genuinely recommend starting with French tips. They’re foundational and will give you the confidence to tackle everything else.
2. Get Your Supplies Sorted!
Pick the budget tier that works for you:
- Budget-Friendly: Shop smart with starter kits and multi-packs.
- Standard Quality: Invest in reputable brands for better longevity and finish.
- Professional: Opt for high-performance tools and polishes for salon-level results.
3. Set Aside 30 Minutes of “Me Time”
Block out some time in your calendar for your nail art session. Treat it like a fun, relaxing self-care appointment!
4. Follow Along with This Guide!
Bookmark this tutorial on your browser or download our handy PDF checklist to reference while you work. It’s like having me right there with you!
5. Share Your Stunning Results!
I can’t wait to see what you create! Tag us on Instagram: @bluebeek #BlueBeekNails or email your photos: info@bluebeek.me
About the Author
Udeshika, Nail Art Specialist & Founder of BlueBeek
With over 7+ years of experience in nail artistry and product testing, I’ve personally tested 150+ nail art products to bring you authentic, real-world recommendations. As a passionate nail enthusiast and content creator, I specialize in beginner-friendly tutorials that translate professional techniques for at-home use, helping you achieve salon-quality results without the salon price tag.
My Personal Promise to You: Every single product recommendation in this article has been tested by me personally for a minimum of 2 weeks. I document real-world performance and share both the pros and cons honestly, so you can make truly informed decisions.
📸 Follow My Nail Art Journey: Instagram | TikTok | Pinterest
Related Articles You’ll Love:
- The Complete Beginner’s Guide to Gel Nail Art at Home
- Master Stunning Velvet Cat Eye Nails: 2026 DIY Guide
- Nail Art Trends 2026
- How to Choose the Best Nail Shape for Your Hands: The Ultimate Guide (2026)
Last Updated: January 30, 2026
Reading Time: 12 minutes
Difficulty: Beginner-Friendly

Udeshika
Nail Art Expert & Founder, BlueBeek 💅
Udeshika is a professional nail artist with 7+ years of experience creating
salon-quality nail art at home. She founded BlueBeek to help beginners master
nail art without expensive salon visits.