Negative space nail art for beginners is one of the most exciting and forgiving nail trends taking over 2026 — and it’s far easier than it looks. If you’ve ever struggled with complex brushwork or tiny intricate mistakes, negative space nail art is the perfect solution. This technique celebrates simplicity by leaving portions of your natural nail intentionally bare, creating stunning minimalist designs without needing salon-level skills.
Forget about needing perfect, non-shaky hands or an expensive kit of professional brushes. This style is a game-changer for anyone learning 👉 easy nail art for beginners. Ready to transform your nails without the frustration? This guide is exactly for you.
What is Negative Space Nail Art?
Negative space nail art is a technique where a portion of your natural nail, typically uncolored or covered only by a clear base, is incorporated into the final design. The ‘space’ is just as important as the polished areas. Think of it like a stencil; you leave parts of the canvas intentionally bare, and the color you do apply creates an intentional, stunning contrast.
For beginners, this style is fantastic because it makes mistakes much less obvious. A tiny wiggle in a line can become a design element. This forgivable nature allows you to build your confidence and fine-tune your control without the pressure of perfect coverage. Let’s get started on your creative journey.
Your Foundation for Success: Step-by-Step Prep
Before we dive into the fun designs, we must ensure your canvas is ready. A negative space manicure puts your natural nail on display, so proper preparation is crucial for a clean, professional look.
- Shape Your Nails: Decide on a shape that suits your style and makes your hands look their best. Check out our guide on 👉 finding the best nail shape for your hands for personalized recommendations. For geometric negative space, an almond or squoval shape often works beautifully.
- Prep the Surface: Gently push back your cuticles with an orange stick and buff the nail surface with a fine buffer to remove any natural oils. Wipe your nails clean with an acetone-free nail polish remover to ensure a strong bond for the polish.
- Apply Your Base Coat: A smooth, ridge-filling base coat is your best friend in negative space nail art. It creates a flawless canvas and protects your nail from staining.
Essential Tools for Beginners
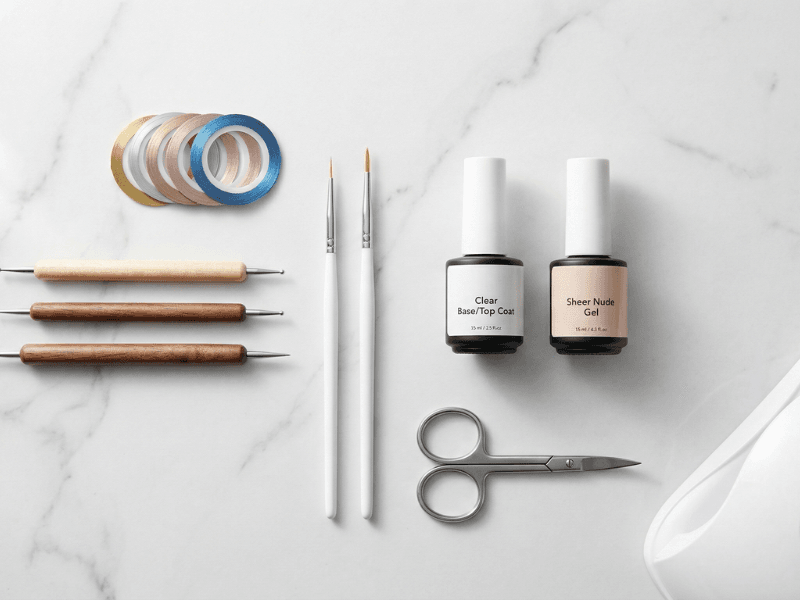
You don’t need a huge kit. To create these negative space looks, you only need a few basics:
- Your Polishes: One or two colored polishes and a clear base and top coat. For 2026, minimalist neutrals, popping pastels, and deep jewel tones are leading the trends.
- Striping Tape: The absolute key to clean, precise lines. This thin tape is a must-have.
- Dotting Tools: For adding simple, precise dots. You can also use the end of a bobby pin or a toothpick.
- A Fine Brush (Optional): Helpful for tidying up and small freehand details.
- A Cleanup Brush & Acetone: Essential for erasing all mistakes.
7 Easy Negative Space Designs for Beginners (2026)
Here are seven stunning designs that you can master at home with just a few simple steps. Each style focuses on using negative space to create maximum impact with minimal effort.
Design 1: The Modern Half-Moon
This design is a chic, modern update to the classic half-moon manicure. By leaving the base of your nail uncolored, you create a timeless look that is easy to do and even easier to maintain.
Step-by-Step Guide:
- After applying your clear base coat, take a small, curved stencil or a circular band of striping tape and apply it to your nail, covering the cuticle-side ‘moon’ area.
- Paint your entire nail, overlapping slightly onto the tape.
- While the polish is still wet, carefully remove the tape, pulling it toward the free edge of your nail. This will give you a clean, curved line.
- Allow the design to dry and finish with a high-shine top coat.
Why It Works for Beginners: It’s incredibly forgiving. As your nail grows out, the growth blends perfectly with the uncolored negative space, making this manicure look perfect for weeks without any fill.
Design 2: The Sideways Peekaboo
This look is geometric, minimalist, and exceptionally easy. It’s perfect for adding a touch of color to a professional look without being overwhelming.
Step-by-Step Guide:
- Place a straight strip of striping tape diagonally from the cuticle corner of your nail towards the opposite free edge. This defines the negative space line.
- Paint one side of the nail (the part that is now a triangle) with your chosen color.
- Wait 10–15 seconds, and then gently peel the strip of tape away.
- Once dry, apply your clear top coat. For a unique look, try this with one color on one nail and a complementary color on another!💡 Pro Tip: For an advanced twist that’s still beginner-friendly, try doing this design with two different colored triangles that meet, with a clear negative space line dividing them.
Design 3: Minimalist Dot Matrix
A simple dotting tool can produce high-impact negative space. A series of single dots adds a sophisticated, understated, and artistic feel.
Step-by-Step Guide:
- Using a small to medium-sized dotting tool, apply 3 to 5 single dots in a straight vertical line, starting near your cuticle and moving toward the free edge.
- Ensure you have clear negative space between each dot.
- Add another parallel vertical line on one side of your first line, with the dots slightly smaller and staggered.
- This creates a matrix that frames your uncolored nail. Apply top coat once fully dry.
Why It’s Great: This design celebrates precision over full coverage, meaning you only need to master one simple action (dotting) rather than smooth, even brushwork.
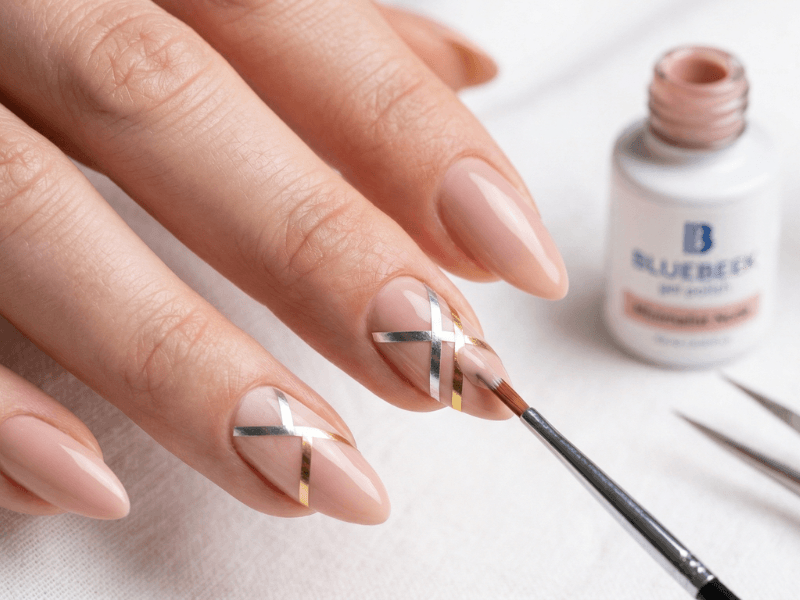
Design 4: Double Chevron Contrast
This geometric design is surprisingly easy with striping tape, and the result is sharp, architectural, and very on-trend for 2026.
Step-by-Step Guide:
- Create a “V” or chevron shape using two strips of striping tape that meet in the center of your nail.
- Add a second, parallel “V” above the first, leaving about a 2–3mm gap of clear nail between the two tape lines.
- Paint the area between the two strips of tape with one color.
- Paint the tip of your nail with a second, contrasting color.
- Carefully remove all tape while the polish is still wet to reveal sharp lines. The area covered by the tape remains clear.💡 Style It Up: If you have some confidence from other techniques, you can add a single metallic dot at the very point where the chevrons meet. For a bold metallic finish on accent nails, try our guide on 👉 chrome powder nails at home.
Design 5: Freehand Single Swoop
While ‘freehand’ might seem scary, this design is actually simpler than it sounds. It requires just a single, confident curve from your nail polish brush. The key is embracing the artistic look rather than striving for perfect symmetry.
Step-by-Step Guide:
- Take your colored polish and carefully wipe most of the polish off the brush, leaving just enough to make a solid stroke.
- Using a light touch, paint a single, wide diagonal swoop across your nail, starting near one cuticle corner and curving to the opposite free edge.
- Apply a clear top coat and, while it’s wet, add a few scattered metallic flecks or a single tiny rhinestone in the uncolored negative space for an instant touch of class.
Why This Freehand Works: The brush stroke adds an artisanal, “painterly” feel. Its simplicity makes it chic, and the lack of complex detail allows you to focus on developing confidence with your brush.
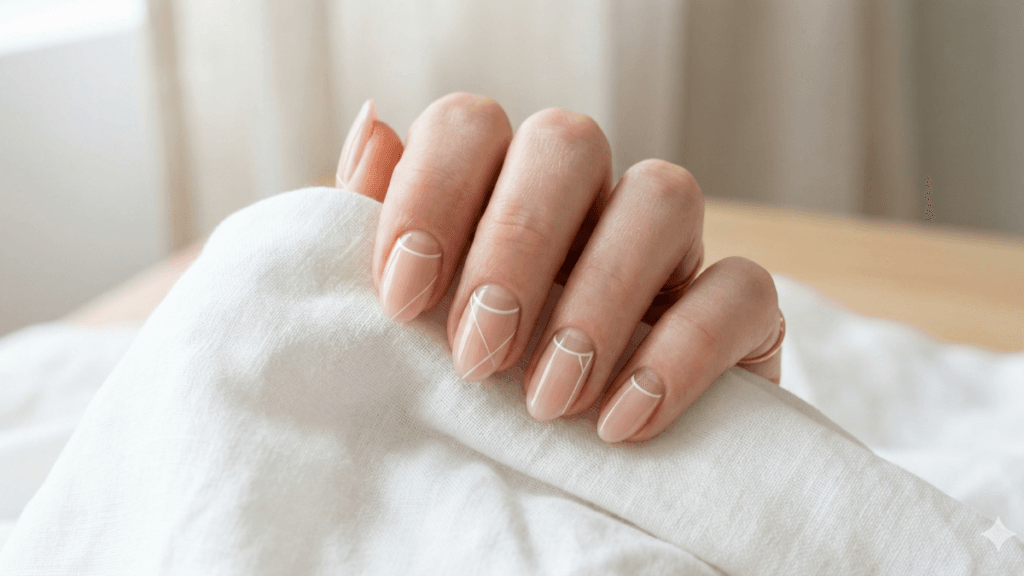
Design 6: Geometric Tape Block
This is all about using striping tape to build intricate, geometric shapes without needing any complex brushwork.
Step-by-Step Guide:
- Randomly place different lengths of striping tape across your nail, creating a variety of triangles, parallelograms, and other shapes.
- Using a different color for each shape, paint inside the blocks you’ve created. For a cohesive look, use 2–3 colors from the same color family (e.g., shades of blue, complementary jewel tones).
- Carefully peel away all the strips of tape to reveal an intricate, modern, and perfectly geometric pattern, where the tape lines remain as sharp, uncolored negative space.💡 Top Tip: Apply your colored polish thinly to avoid the paint building up too much at the tape’s edge, which can lead to tearing when you pull the tape off.
Design 7: The “Frame” Manicure
A reverse of the typical painted nail, the ‘frame’ negative space look paints the edges and leaves the center natural. It is a stunning effect and remarkably easy.
Step-by-Step Guide:
- Take a thick piece of masking tape or a large stencil and apply it to the direct center of your nail, leaving a consistent border (about 2mm) of the nail visible all the way around.
- Using a fine-tip brush (optional but helpful), paint the exposed border of your nail with your desired color.
- While the paint is wet, pull the center masking tape away to reveal a clear, natural center perfectly framed by a colored border.
- Finish with a clear top coat.
Why It’s a Favorite: This look makes your nails appear slimmer and longer while incorporating your natural nail into the design.
Pro Tips for Perfect Negative Space Nail Art
- 🎨 Work with Clean Polishes: For the best contrast, use highly pigmented, opaque polishes. Sheer or patchy colors will make your negative space looks appear messy and less intentional.
- 🖤 Striping Tape is Your Best Friend: Don’t try to freehand straight lines as a beginner! Rely on striping tape for clean lines. Apply the tape firmly to dry nails before painting.
- ⏱️ Always Remove Tape When Wet: This is the most crucial step. Removing tape while the polish is wet gives you a flawless, crisp edge. Waiting for it to dry can lead to tears or lifted edges.
- 🧹 Tidy Up with Acetone: Use a fine cleanup brush dipped in acetone to quickly erase any little wiggles or polish where it shouldn’t be, especially around the cuticles.
- ✨ Seal It All In: A good top coat prevents chipping and adds a glossy finish that makes the colors pop. Try a matte top coat over geometric designs for a very contemporary, sophisticated result.
What’s Next in DIY Nail Art?
Once you’ve mastered these foundational negative space looks, you might be ready for a bit more challenge. You can easily start combining effects. For example, why not add a shimmering layer of 👉 chrome powder nails at home over the painted portion of your sideways peekaboo design for a truly futuristic result? Or, for an ultra-mod effect, you can create a negative space design and then incorporate a 👉 glass nail finish on the uncolored part for a look that is understated yet stunning.
Feeling adventurous after mastering these clean, minimal lines? Check out our other popular guide on creating the shimmering, holographic effect of 👉 velvet cat eye nails at home. This is a big trend for 2026 and can be an exciting next step in your nail art journey.
How to Choose Your Technique
| Feature | Striping Tape | Freehand (Brush) | Stencils |
|---|---|---|---|
| Best For | Geometric lines, sharp angles | Organic swoops, abstract art | Curved lines, half-moons |
| Ease of Use | ⭐⭐⭐⭐ High | ⭐⭐ Medium | ⭐⭐⭐ Medium |
| Line Cleanliness | ⭐⭐⭐⭐⭐ Perfect | ⭐⭐⭐ Depends on control | ⭐⭐⭐⭐ Very Good |
| Versatility | ⭐⭐ Straight lines only | ⭐⭐⭐⭐⭐ Unlimited | ⭐⭐⭐ Pre-set curves |
| When to Use | Geometric designs | Design 5 & 6 details | Design 1 & 7 |
Frequently Asked Questions
Q: Is negative space nail art really for beginners?
Yes, absolutely! The most beginner-friendly part is that it doesn’t require full, opaque coverage. Mistakes in a tiny line are much easier to fix than mistakes in a full-coverage paint job, making it a low-stress, highly rewarding technique.
Q: My lines are never clean. What am I doing wrong?
The most likely culprit is either waiting too long to remove your striping tape or not applying the tape firmly enough. Try applying the tape with good pressure on a dry base coat and always remove it immediately after applying your colored polish, pulling it gently but firmly away from the colored area.
Q: Can I do negative space on short nails?
Yes, and it looks amazing! The right negative space design — like the Modern Half-Moon or the “Frame” Manicure — can actually make your nails look longer by drawing the eye to specific areas. Stick with simpler, minimalist designs for the best impact on short nails.
Q: Will negative space nail art chip faster?
Since negative space often leaves the edges of your nail uncolored, chipping can actually be less noticeable. To make your polish last as long as possible, always finish with a high-quality top coat and be sure to “cap” the free edge of your nail with polish.
Your Creative Journey Starts Now
The most important tip is to have fun and experiment. Try different colors, combine designs, and see what you can create. Your nails are your canvas, and negative space nail art is the perfect, forgivable art form to explore. Grab your striping tape, pick your colors, and get started today!
You don’t need expensive tools or years of practice to create stunning results. Master these simple designs, and you’ll be amazed at the sophisticated looks you can achieve right from the comfort of your home in 2026.