Dotting tool nail art for beginners is the fastest, most forgiving way to create beautiful floral designs at home — and it’s far easier than it looks. If you’ve ever stared at a tiny, perfect daisy on someone’s fingernail and thought “I could never do that,” here’s your wake-up call: you absolutely can.
You don’t need the steady hand of a surgeon or the brushwork of Da Vinci. You need a tiny metal ball on a stick, a little patience, and this guide. That’s it.
In 2026, the coquette and cottagecore aesthetics have pushed floral nail art to the top of every trend list. And instead of expensive nail stickers or complex hand-painting, the dotting tool gives you that same high-end floral look in minutes — at home, for almost nothing.
What Is a Dotting Tool — And Why Does Every Beginner Need One?
A dotting tool is a simple handle with a round metal ball tip. Most beginner sets come with multiple sizes — from a pin-prick tiny ball to a large marble-sized tip. In dotting tool nail art for beginners, the size of the ball directly controls the size of your flower petals.
- 🔸 Small Tips — Perfect for delicate forget-me-nots, tiny filler flowers, and detail work
- 🔵 Large Tips — Ideal for bold 70s-style “power flowers” and large blossom centres
No dotting tool yet? Improvise with a bobby pin, toothpick, or sewing pin head. They work surprisingly well for a first attempt — but a dedicated set gives you far more consistent results and is worth the small investment.
Why Dotting Tool Nail Art for Beginners Beats Brushes Every Time
Brushes require pulling the polish across the nail — which causes streaking if your pressure isn’t perfectly even. Dotting tool nail art works differently: you’re simply depositing a bead of polish onto the nail. No dragging, no pressure control, no artistic skill required.
Before the tool even touches your nail, you can see exactly how much polish is loaded on the tip. That level of predictability is why even professional nail artists return to dotting tools for their most detailed client work. It is the most forgiving nail art technique that exists — which is exactly why it’s the perfect starting point for beginners.
1. The Five-Dot Flower: The Foundation of Dotting Tool Nail Art
The Five-Dot Flower is the cornerstone of all dotting tool nail art for beginners. It looks polished and professional when finished, yet takes less than two minutes to create per nail.
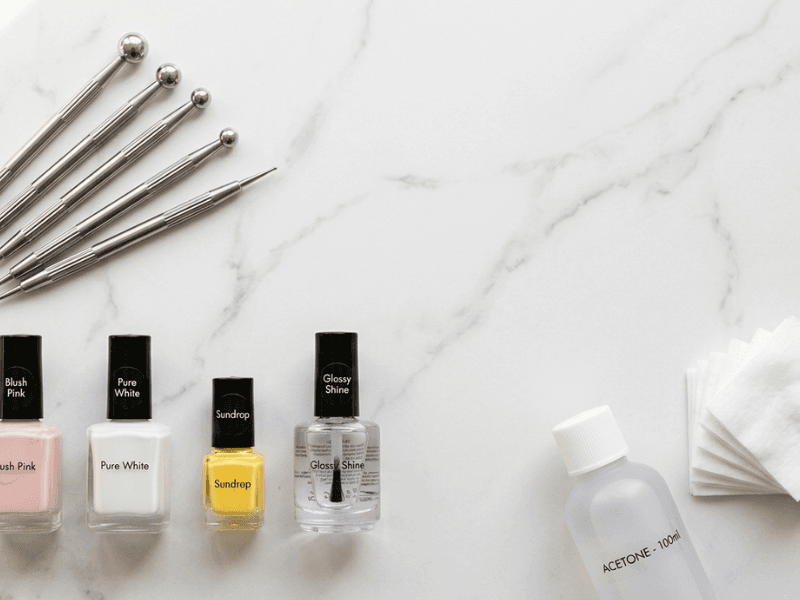
What You Need:
- Dotting tool (medium tip)
- Base colour (any shade — lavender, nude, or white work beautifully)
- Petal colour (soft pink, white, or coral)
- Centre colour (yellow, gold, or mustard)
- Top coat
Step-by-Step: Five-Dot Flower Technique
Step 1 — Paint Your Base
Apply your chosen base colour and let it dry completely. A solid, dry base ensures your dots sit cleanly on top without sinking in or smearing.
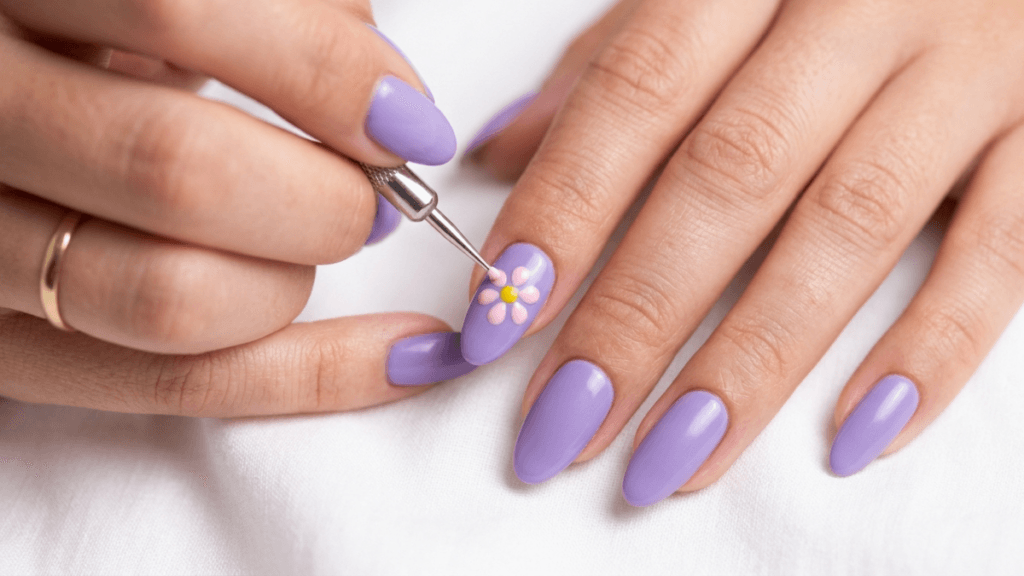
Step 2 — Place the Centre Dot
Dip your dotting tool into your centre colour (yellow or gold works beautifully). Place one single dot in the middle of your nail — this is the heart of your flower.
Step 3 — Add the Five Petals
Clean your tool. Dip it into your petal colour. Place five dots evenly around the centre dot in a circular arrangement.
💡 Pro Tip: Don’t aim for perfect circles. Let each petal dot just touch the centre dot — this creates a naturally cohesive blossom that looks hand-crafted rather than mechanical.
Step 4 — The Optional Drag Effect
While the petal polish is still wet, take a toothpick and lightly drag from the outer edge of each petal toward the centre. This creates a beautiful starburst or teardrop petal effect that elevates the design instantly.
Step 5 — Seal with Top Coat
Once completely dry, apply a generous layer of glossy top coat over the entire nail. This protects the dots and gives your dotting tool floral nail art that professional, high-gloss finish.
2. Advanced Floral Layouts for Dotting Tool Nail Art
Once you’ve mastered the single five-dot flower, it’s time to think about composition. Placement transforms a few dots from random to intentional — from “polka dot accident” to “curated garden.”
The Corner Cluster
Place three flowers of different sizes in the bottom corner of your nail — one large, one medium, one small. This asymmetric layout looks editorial and intentional, and it’s one of the most popular dotting tool nail art styles on Pinterest in 2026.
The Half-Daisy Edge
Position the centre dot right at the very edge of your nail so only three or four petals are visible. The rest of the flower appears to continue beyond the nail — creating a sophisticated “luxury wallpaper” effect that looks far more complex than it actually is.
The Floral French Tip
Skip the traditional white line entirely. Instead, use your dotting tool to create a row of tiny flowers along the nail tip. Alternate between two petal colours for a whimsical, delicate finish. This pairs beautifully with our French Tips for Beginners guide.
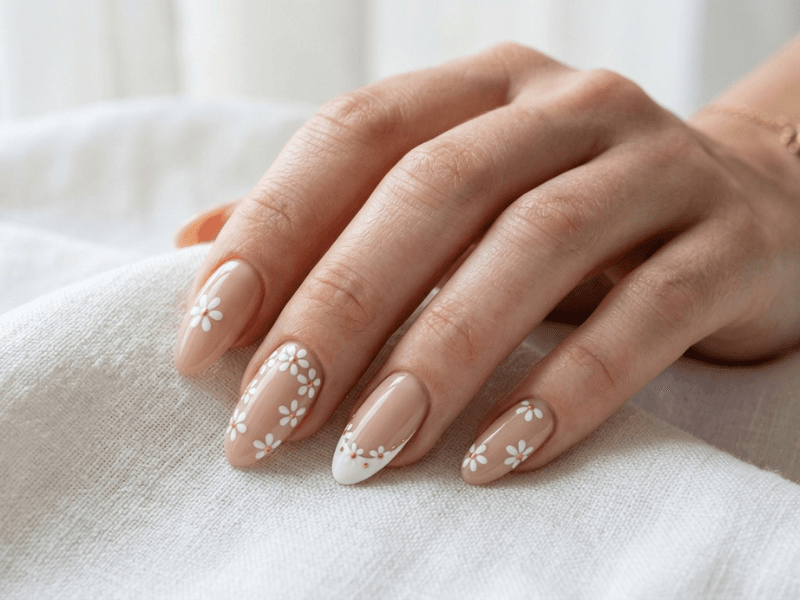
The Scattered Garden
Place five to seven tiny flowers of varying sizes across the nail in a loose, organic scatter pattern. Leave some negative space between flowers — the empty space is part of the design.
3. Best Colour Combinations for Floral Dotting Tool Nail Art in 2026
| Aesthetic | Base Colour | Petal Colour | Centre Colour |
|---|---|---|---|
| Coquette | Soft Blush Pink | White | Gold |
| Cottagecore | Sage Green | Cream White | Yellow |
| Aura / Pastel | Lavender | Soft Coral | Pale Gold |
| Bold & Retro | Cobalt Blue | White | Sunshine Yellow |
| Minimalist | Nude/Beige | White | Clear Glitter |
| Dark Romance | Deep Burgundy | Dusty Rose | Gold |
4. Troubleshooting Common Dotting Tool Problems
Even with dotting tool nail art for beginners, things can occasionally go sideways. Here’s how to fix the most common issues:
- 🧵 “Stringy” Polish — Polish is drying too fast on your palette. Add one drop of nail polish thinner, or use a fresh drop of polish every 2–3 minutes
- 💧 Flat, Dull Flowers — You’re pressing too hard. Lightly touch the ball tip to the nail surface rather than pushing it down — dotting tool nail art requires a feather-light touch
- ⭕ Uneven Petals — Polish is loading unevenly onto the tip. Always dip straight down into the polish, never at an angle, to ensure even loading on all sides
- 🔴 Dots Smearing — Your base coat isn’t fully dry. Always wait the full drying time before adding dots on top
5. How to Clean and Maintain Your Dotting Tools
Proper care keeps your dotting tool nail art consistent across every manicure. Polish that dries on the metal ball creates a lumpy surface that ruins dot shape. Follow these simple maintenance habits:
- 🧹 Clean Between Colours — Wipe the tip on a lint-free pad soaked in acetone between every colour change
- ⏱️ Clean Immediately After Use — Don’t let polish dry on the tip. A 10-second wipe right after use prevents hours of scrubbing later
- 🔍 Check the Ball Shape — Inspect your tips regularly. A warped or scratched ball tip creates uneven dots — replace when needed
- 📦 Store Tip-Up — Store dotting tools vertically with tips facing up to prevent the metal balls from scratching against each other
For professional-grade stainless steel dotting tools, Makartt’s dotting tool set is one of the most highly rated beginner kits available in 2026. (DoFollow external link)
Frequently Asked Questions About Dotting Tool Nail Art for Beginners
Q: What is the best dotting tool for nail art beginners?
A dual-ended dotting tool set with 5 tools (10 tip sizes) is ideal for beginners. It covers everything from tiny detail flowers to large bold blossoms, giving you full creative range from day one.
Q: Can I use a toothpick instead of a dotting tool?
Yes — a toothpick works well for small detail dots and fine centre points. For larger, rounder petals however, a proper dotting tool gives significantly more consistent and cleaner results.
Q: How do I stop my dots from smearing?
Always ensure your base colour is completely dry before adding dots. Rushing this step is the single most common cause of smeared dotting tool nail art for beginners.
Q: How do I make perfectly round dots?
Dip straight down into the polish (not at an angle), then touch the tip lightly and lift straight up — don’t drag or swipe. The rounder your loading, the rounder your dot.
Q: Can I do dotting tool nail art on gel nails?
Absolutely. Use gel polish on your dotting tool and cure each design layer under your UV/LED lamp before adding the next colour. The technique is identical.