Let’s Be Real — Polygel Removal Doesn’t Have to Be Scary
We all love how polygel nails look — strong, lightweight, and absolutely gorgeous. But let’s be real: the moment they start lifting, the first thought that crosses your mind is “How on earth do I get these off without wrecking my natural nails?”
If you don’t own an e-file, don’t panic. You do NOT need one. If you are looking for the safest way to remove polygel without drill tools, you are in the right place. I’ve removed hundreds of polygel sets using nothing but a few simple tools you probably already have at home. This guide will walk you through exactly how to remove polygel without drill damage, protecting your natural nails and keeping them healthy. Let’s get into it!
🛠️ What You’ll Need (Your Removal Toolkit)
Before we start, gather everything so you’re not running around mid-soak. Here is your checklist:
- 100/180 grit nail file (coarse end first, then fine)
- 100% pure acetone (not regular nail polish remover — it must be pure acetone)
- Cotton balls or acetone-soaked pads
- Aluminum foil (cut into small squares, one per nail)
- Cuticle pusher or orange wood stick
- Cuticle oil (this is non-negotiable — I’ll explain why below)
- Optional: A nail buffer block and hand cream for after
Got everything? Perfect. Let’s go!
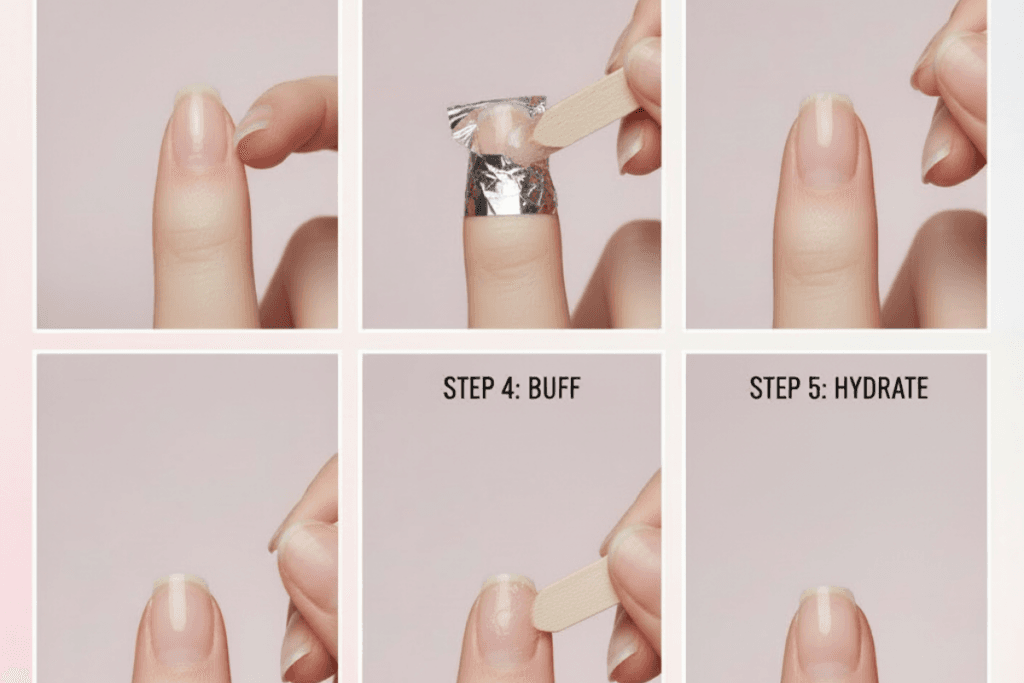
✨ How to Remove Polygel Without Drill: The 5-Step Process
Step 1: Clip the Length and Break the Top Seal
Start by clipping your nails down as short as you comfortably can. This reduces the amount of product you need to file through and makes the whole process faster.
Next, using the coarse side (100 grit) of your nail file, file off the shiny top coat and as much of the surface layer of polygel as possible. You’re not trying to file it all off — just break the seal so the acetone can penetrate deeply. File in one direction to avoid unnecessary friction damage.
💡 Pro tip: Keep filing until the surface looks completely matte and dull. No shiny patches left!
Step 2: The Acetone Soak (The Foil Wrapping Method)
This is where the magic happens. Soak a cotton ball in 100% pure acetone and place it directly on top of your nail, making sure it fully covers the polygel surface. Then wrap your fingertip tightly in a small square of aluminum foil to keep the cotton in place and trap the heat.
Repeat this for all 10 fingers, then set a timer for 15–20 minutes. Sit back, relax, and let the acetone do the heavy lifting. The foil creates a warm environment that helps the acetone break down the polygel much faster than open-air soaking.
⚠️ Caution: Keep away from flames during this step — acetone is highly flammable!
Step 3: Gently Scrape Away the Softened Gel
Once your timer goes off, remove the foil and cotton from one finger at a time. The polygel should look soft, gooey, and slightly lifted from the nail plate — almost like thick putty.
Using your cuticle pusher or orange wood stick, gently push and slide the softened product off the nail in small, careful strokes. Work from the cuticle area downward. Do not force it. If a section isn’t budging, re-wrap that finger for another 5–10 minutes rather than scraping harder.
Step 4: Lightly Buff Away Any Remaining Residue
Once the bulk of the polygel is off, you may notice a thin layer of residue left on the nail plate. Switch to the fine side (180 grit) of your file or a buffer block and very lightly buff the nail surface to remove any leftover product.
Be gentle and minimal here — you’re just smoothing, not aggressively filing. Over-buffing thins the natural nail plate and weakens it. A few light passes are all you need.
Step 5: Hydrate and Nourish — This Step is NOT Optional!
This is the step most people skip, and honestly? It’s the most important one. After acetone exposure, your nails and surrounding skin will be extremely dry and dehydrated.
Immediately after removal, massage cuticle oil generously into each nail and cuticle. I highly recommend doing this twice — once right after removal and again before bed. Follow up with a rich hand cream to restore moisture to the skin. Give them this nourishment and they’ll bounce back beautifully. 🌸
🚫 What NOT to Do During Polygel Removal
Let’s talk about the habits that can seriously damage your natural nails. I know it’s tempting — but please avoid these at all costs:
- ❌ Do NOT peel or pry off the polygel: When you forcibly rip off polygel, you’re pulling off the top layers of your actual nail plate with it. This causes white patches and thinning.
- ❌ Do NOT bite or chew at lifting edges: Beyond the obvious hygiene issue, this causes uneven damage across the nail.
- ❌ Do NOT rush the acetone soak: Skipping time and forcing removal is the #1 cause of nail damage during DIY removal.
- ❌ Do NOT use low-quality acetone: Regular nail polish remover is not strong enough. Always use 100% pure acetone for polygel and hard gels.
🎉 You Did It — Now Give Your Nails a Little Break
And that’s it! Now you know exactly how to remove polygel without drill machines, keeping your natural nails intact and salon-worthy. See? Not scary at all when you follow the right steps
Once you’ve removed your polygel, I highly recommend giving your natural nails at least 1–2 weeks to breathe before your next application. Keep applying cuticle oil daily, stay hydrated, and let your nails regain their strength.
Speaking of healthy nails — now that your polygel is off, you’ll want to make sure your natural nails are in top condition before your next set. 👉 “How to Maintain Healthy Natural Nails” post
Have questions about the removal process? Drop them in the comments below! 👇 I read every single one and I’m always happy to help. And if this guide saved your nails today, share it with a friend who needs it — because we’re all in this nail journey together. 💕
— Udeshika, Founder of BlueBeek